
My blog will be accessible to many people, and can be accessed through other social medias by using hyperlinks like on facebook or on DeviantArt linking back to this blog to promote it. In turn I can use hyperlinks on this blog for them so that they can be accessed through here to. Images linking to my blog posts will and can be posted as well, though some don’t need to link to them I suppose. The technology is not necessarily very complex as I understand how to use it in a way that will benefit me. The design of my blog can be changed to my liking and to whichever I feel I want it to be to convey a mood or feeling. I plan to communicate my work in stages, with pictures of the work maybe or just written feelings on how the work turned out, though I suppose it would be better to show the work I am commenting on and it will most likely have a organised fashion if I want it to be. Subtitles or speech could be added for accessibility to those who have problems with hearing or seeing, like an option to click a button and have the blog read out to them. Or even a picture described to them.
Author: Heather
This blog will contain my folio work.
Task 2
Computers, tablets and phones can be used for accessing online web galleries and image sharing sites from apps or using the web browsers available to them. Even this website can be accessed through a computer or phone, or tablet as well. You can also produce and publish artwork on these as well posting it on many online galleries to give it a better chance at being noticed. Apps used on tablets or phones for sharing artwork and others can be amino, Tumblr etc. These can also be accessed through web browsers on computers as well though, but have been made accessible through phones through apps to make it easier and quicker for those without computers.
The same can be said for video file sharing, using an app of youtube on a phone or tablet, and a web browser on the computer to access videos through Vimeo or Youtube. Forums can be accessed through the same way, though I don’t use forums myself. Most websites can be accessed through mobile and tablets through apps or their browsers. And blogging and social media are also accessed through apps and browsers.
Brief descriptions:
Online web galleries: these are used for people to share their artwork and market it by posting work and directing people to their commissions or to buying prints alternatively. Sites – DeviantArt, Tumblr, Amino
Video file Sharing: these are used for people to share videos they have made or found, like animations or vlogs of their daily lives and people can make a profit from these by views and likes through a partnership or by ads that are advertised on them. And you can get comments to improve and even make friends. Sites: Youtube, Vimeo
Forums: Forums are used for people to debate and discuss different ideas and share their opinions explaining why they don’t like something or if they do like it etc. Sites: Reddit, 4Chan, Tumblr.
Blogging: Blogs are also used to express your opinion on things, and keep a log about different topics that interest you to create different opinions and keeping a record of things. And people create the layout of their own blogs. Reporting on news though also on personal aspects like how their day went. It’s user generated. Sites: Tumblr, WordPress.
Social media: Social media is used to talk to people, and also express your opinion, but with a select amount of people, social media is used as a basis for interacting with people you could otherwise not interact with without jumping on a plane. Though the same can be said about these other ones. Social media can be more personalised and about your life. Sites: Facebook, Myspace.
Task 3
The RGB (Additive) Colour mode controls the aspect of Red Green and Blue amounts in the foreground or background colour of the chosen part you want coloured. Having 255 of a certain colour will make it the fullest version of the colour you choose to make it, either Red Green or Blue, though you must also make the other colours, 0 like in this example shown. Alternatively making the colours different numbers all having a value will mix the colours together though, creating a combination of the colours. Essentially this colour mode brightens the colours used and chosen. RGB is used for computer displays.


Moving on to the CMYK (Subtractive) Colour mode this mode C stands for Cyan, M Magenta, Y for Yellow and K for Key – the key colour these days being black. And in turn controls the amount of these set colours being distributed into the colour area you want to change. Altering the colour, differently than RGB, making it less intense in a sense, more darker. CMYK is used for hard copies of printed colour illustrations.


In the bottom area under HSB and RGB the input area with the # key in front of it is where hexadecimal keys are used for colour picking and defines the colour you have in the screen area. It refers to screen colours.

HSB is Hue Saturation and Brightness, and controls these aspects of the colour you are working with. Changing the colour with hue, and the intensity of the colour as well. Brightness clearly controls how bright and I suppose intense that the colour is like saturation too.


Changing all of this, making a picture or a piece of artwork greyscale removes the colour completely from it.

In pulling up a histogram panel in photoshop we are shown the tonal range – the key type of an image by showing how the pixels are put around with a graph of the number of pixels that are at each of the 256 brightness levels in the image.


An image will have a transparent layer if the background is checkerboard and to retain and keep the transparency we need to save the file as a .PNG. Select and mask can also be used to make something inherently transparent, showing the checkerboard behind it. Like with the background I was using that was white in this one.


Alpha channels get their name from something called alpha compositing, combining a partially transparent image with another image. the information about the shape of the transparent area is kept in the alpha channel safe and sound. It’s saving your selections for you to go back on and change if you feel like it.
Task 4

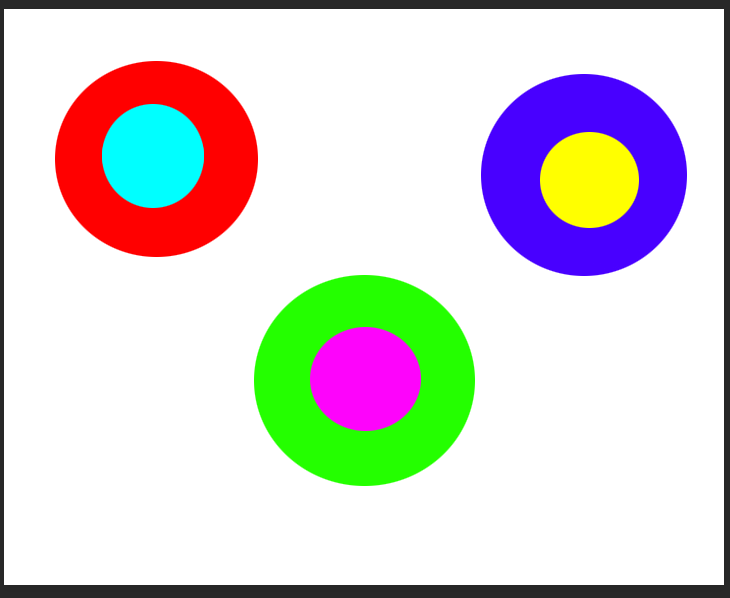
Using the RGB colours 
I created a greyscale composition using filled shapes

These are the basic number codes used to create these in the RGB colour mode


Task 4 (2)


Exploring analogous colours, adding more green or blue to the colour purple/violet altering it. 
Again, exploring analogous colours, though adding the full amounts of the colours e.g – 255G 255R 0B


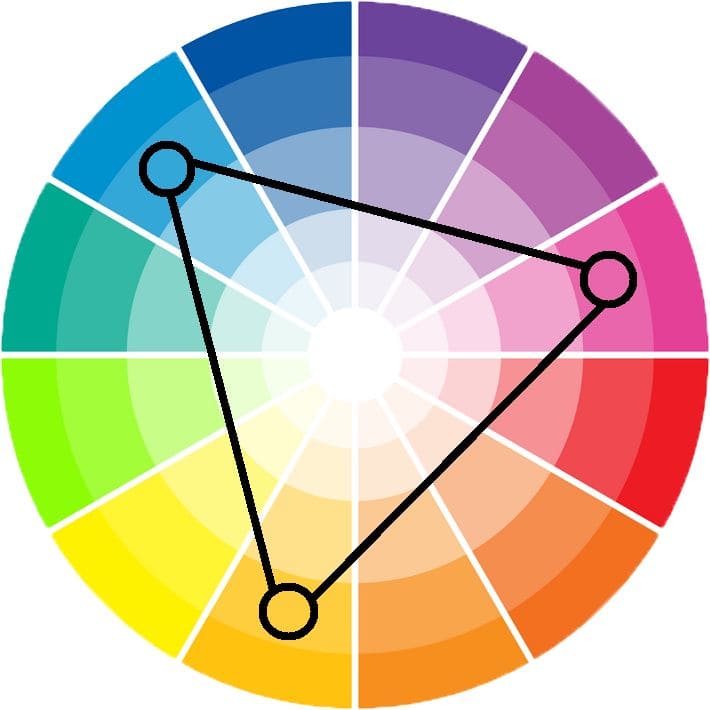
I looked into triadic colour systems, though I didn’t fully understand it. I plan to askthe lecturer about this look more into this during my free time.
Task 4 (End)


Exploring the hue function in the colour picker seeing what different hues can be gathered from it


This again was a exploration into the tone/brightness aspect.


Task 5
Raster Images and Pixel Grids come part in parcel, with pixel grids being involved in the making of raster images. The quality of the picture can be determined by this too, the quality getting degraded by this if zoomed into. You can see the blurriness and pixels when the image is zoomed into and you can see the pixel grid too.
The resolution of the image can be made better if there is a higher dpi on the file, as the resolution is measured in dpi. Though, with this the higher the dpi the bigger the file will be and you must be mindful to check if the device you’re using can handle the resolution and dpi you’re pumping out.
The Raster images are very hard to scale, up as the quality of them can go down every time it’s scaled. But, they are easily scaled down, the image becoming less sharp and more soft when done. Some common file formats for raster images – TIFF, JPEG, GIF, PCX and BMP.
Vector files tend to look more crisper when zoomed into and have a slick clean cut, with no pixels showing. Vector based images are based upon mathematical formulas derived from geometric primitives like polygons, lines, curves, circles and rectangles.
Line art graphics are best used with vector graphics, as it has flat uniform colours. Vector images are also not based upon resolution, so the quality would not dip. The quality of vector images vary upon whatever device is being used to display them can handle – when rendering them.
Like with a printer as well the quality would not change, unlike with raster images, where the quality can shift when it is printed out. Some common formats for vector files – AI, EPS, SVG, and PDF
XY and Z coordinate systems show how our image is displayed to us. In a 3D sense, the image/things in the image would be displayed to us in a 3 dimensional plane. We would be able to see the front, back middle and sides of the object in question by scrolling around it with the XY and Z coordinate system.
To understand Anti-alias of an image we must first grasp what aliasing of an image is, this is when the quality of the image (Resolution) is too low. This causes a “stair-stepping” effect on the images edges, making it look less smooth and more crooked. Anti-Aliasing is when these edges are smoothed out by having the colours of the image averaged at a boundary.
Aspect ratio refers to the width to height of the image or screen displaying the image.

Raster images and pixel grids


Bit Depth


Anti-Alias

Task 6
This is me making a simple animation of an opacity change – fading it up and down on adobe after effects.


Moving on, this is me making an animtion of a elipse moving from A-B one side of the screen to the next.


Then having an animation where the keyframes fill colours for some shapes on the screen, though I decided to remove others from two of the shapes in contrast.


In relation to my understanding of colour, I chose specific contrasting type colours in the last part of the animation, and in the first two I used the full red colour as discussed in the previous tasks.
As I found out, vector files are sometimes not treated kindly on after effects, with you needing to put the setting on to continuously raster the file. This is a problem if you have slow processing speeds. As it infinitely slows down the reaction speed of your computer with it lagging greatly when preforming simple after effects tasks while also trying to maintain the smoothness you want.
This however had no effect on this animation as I used the shapes provided. My bit depth for this computer would be very high, as it has a 120 hz refresh rate. This determines the smoothness of the animation displayed as well, and it was displayed crisply to me on my laptop.
And for the screen resolution, my screen on this laptop has a 1920-1080p screen resolution. So it would be displayed in HD quality, and I in turn put the resolution for my animation to be 1920-1080p so it is HD.
In another animation I was doing, I found the anti aliasing effect to come into effect. As with it I was getting very frustrated, as the image kept looking the way the “stairs effect” was described, so I made some adjustments and it ended up looking alright, even adding the continuous rasterizing onto it.
With screen location, I assumed it was where the video was being played from. So viewing it on another device, like an iphone or a TV, shows that the quality hasn’t degraded in any way or really altered. It works well when being played back from them.
Task 7
Describing a range of graphic file formats and how they work: –
TIFF – a filetype ending in .tif TIFF stands for Tagged Image File Format, these images can have very large file sizes as they are uncompressed. So in turn they have a lot of detailed image data in them. TIFF images have a range of colours, and can be very flexible with colour, with grayscale, CMYK for prints and RGB for the screen view.
JPEG – a filetype ending in .jpeg, this stands for Joint Photographic Experts Group. JPEG files contain images that have been compressed unlike TIFF files. They are like this so they can contain a lot of the information that are in photos.
Some of the image detail is lost during the compression though to make the file smaller – lossy compression. JPEG files are used for photographs that are on the web as the small file size is created from them, and they load well on webpages and look great.
It’s not recommended to use the JPEG filetype to store any logos or digital art/graphics as the compression of the JPEG filetype makes the image look blurry and have jagged lines.

GIF – a filetype ending in .gif GIF stands for Graphic Interchange Format. GIF filetypes are also compressed, but not the lossy way that JPEG files are. GIF is lossless, thus no detail is lost when it’s compressed.
GIFs are mainly suited for the web, as they don’t work well when printed out. And because of their limited colour range they are not used for photography. GIF file types are used for animations as well.

PNG – a filetype ending in .png PNG stands for Portable Network Graphics, this filetype was created as an open graphic format to essentially replace GIF filetypes as the GIF patent was owned by one company and no one else wanted to pay liscensing fees for it. Compared to GIF files it has a full range of colour and better compression of the files.
PNG is used only for web images and not for print images. PNG is not normally used for photographs as it makes a larger file than JPEG does. Line art images or graphic files are good for PNG as it makes the images look less “bitmappy”/pixelated.
Raw Image Files – raw image files normally have data from a digital camera. They’re called raw as they haven’t yet been processed and can’t be edited or printed yet. There seem to be many raw formats for each camera company – they all have their own proprietary format.
Raw files are not compressed and have a lot of data in them. The file size is really large. These files are normally changed to .tif files before editing and colour correcting them.

Task 7 (End)
Advantages and Disadvantages of Lossy and Lossless file compression
Lossless
Lossless file compression reduce the file size while keeping the quality and colour, and decompressing it retrieves the original date. The data in the file is only thrown away until you decompress the file again so you are able to transfer the file. A file used for this one is .zip, and this file type is quite common to use to compress it with lossless compression. The problem with this is that it doesn’t compress the file (make it as small as) lossy compression would make a file.

Lossy
Lossy file compression reduces the file size while not keeping the full quality and colour of it. The other main issue is that it permenantly throws away the pixel information that it compresses. The original data is not retrieved when it is decompressed, it’s lost forever (hence the lossy). Though this is still relevant, and the data that is forever gone does not always look like it’s not there. Lossy compression is good at finding information that we don’t see or can’t see in a sense and removing it to compress the file.

MetaData and Meta File and how it’s used in computer graphics
MetaData is a file that defines a group of other files and and gives us a summary of the information that they contain. Though, there is another metafile that is used normally in computer graphics, and they define objects, and images while using a specific list of coordingates.
This other type are used for vector images like in Adobe Illustrator, CorelDRAW and any EPS files, though they can contain raster images as well.

Common file naming conventions
People tend to name files with v1 or v2 if it’s the second one and so on and so forth with the rest of the versions. But use an _ underscore to add a space between it. Though with more than 9 files use 01, 02, 03 etc. We also need relevant nformation in the file name, that provides a brief description and context of what is in that file. Here is a simple file naming convention I have found while looking YYMMDD_Project_Country_Event_Number.xxx.
The thing with my file names, is that I normally prefer to have many folders to organise the files even further with labeling the assesment, then task number and things like that. I prefer to save things quickly and as soon as possible, and sometimes do not have the time to put so much information into the title of the file name.

The importance of file management and location
You must have files kept in the right place as you can easily loose a file if you have multiple files and folders like I do on my usb, and if you were to name it incorrectly then it would be even more difficult. You could even end up accidentally deleting the file when clearing out your usb as well.
